# Hands-on
We learned what ML-Agents is and how it works. We also studied the two environments we're going to use. Now we're ready to train our agents!
 To validate this hands-on for the certification process, you **just need to push your trained models to the Hub.**
There are **no minimum results to attain** in order to validate this Hands On. But if you want to get nice results, you can try to reach the following:
- For [Pyramids](https://huggingface.co/spaces/unity/ML-Agents-Pyramids): Mean Reward = 1.75
- For [SnowballTarget](https://huggingface.co/spaces/ThomasSimonini/ML-Agents-SnowballTarget): Mean Reward = 15 or 30 targets shoot in an episode.
For more information about the certification process, check this section 👉 https://huggingface.co/deep-rl-course/en/unit0/introduction#certification-process
**To start the hands-on, click on Open In Colab button** 👇 :
[](https://colab.research.google.com/github/huggingface/deep-rl-class/blob/master/notebooks/unit5/unit5.ipynb)
We strongly **recommend students use Google Colab for the hands-on exercises** instead of running them on their personal computers.
By using Google Colab, **you can focus on learning and experimenting without worrying about the technical aspects** of setting up your environments.
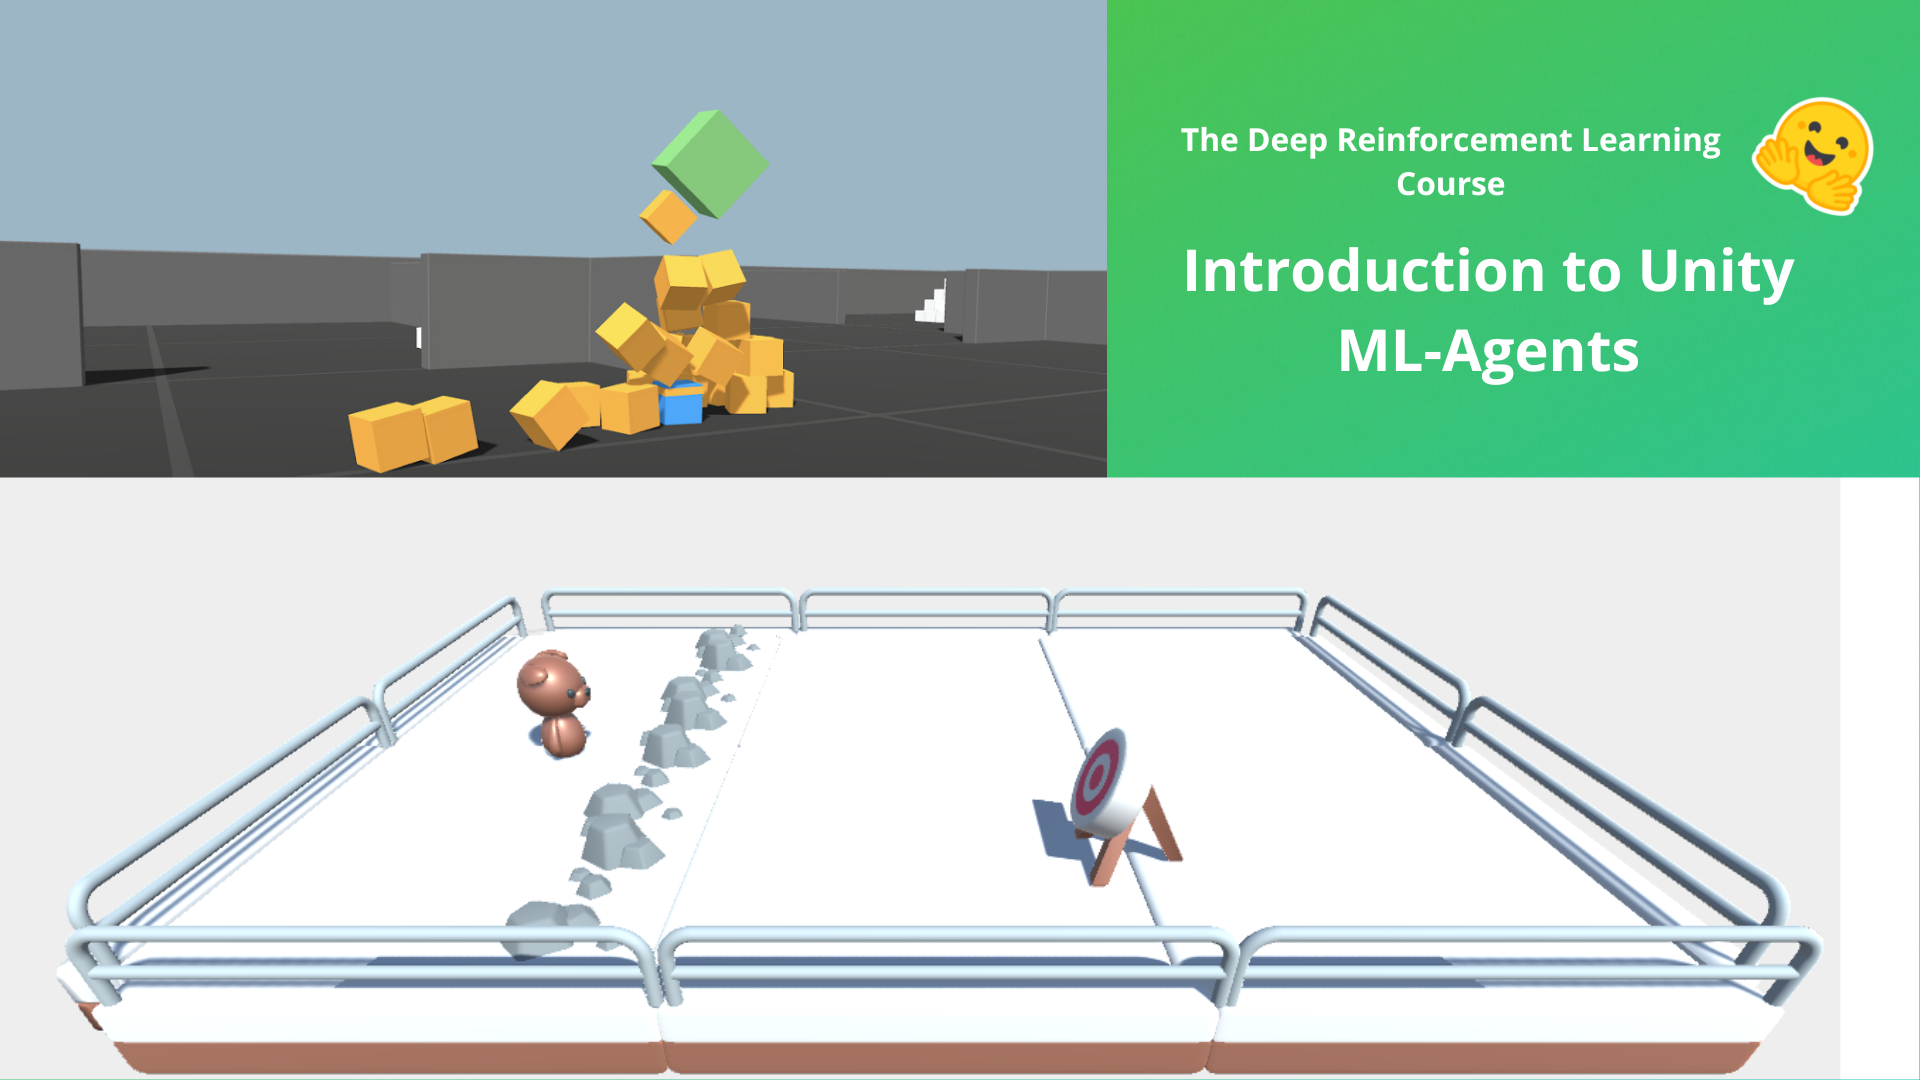
# Unit 5: An Introduction to ML-Agents
To validate this hands-on for the certification process, you **just need to push your trained models to the Hub.**
There are **no minimum results to attain** in order to validate this Hands On. But if you want to get nice results, you can try to reach the following:
- For [Pyramids](https://huggingface.co/spaces/unity/ML-Agents-Pyramids): Mean Reward = 1.75
- For [SnowballTarget](https://huggingface.co/spaces/ThomasSimonini/ML-Agents-SnowballTarget): Mean Reward = 15 or 30 targets shoot in an episode.
For more information about the certification process, check this section 👉 https://huggingface.co/deep-rl-course/en/unit0/introduction#certification-process
**To start the hands-on, click on Open In Colab button** 👇 :
[](https://colab.research.google.com/github/huggingface/deep-rl-class/blob/master/notebooks/unit5/unit5.ipynb)
We strongly **recommend students use Google Colab for the hands-on exercises** instead of running them on their personal computers.
By using Google Colab, **you can focus on learning and experimenting without worrying about the technical aspects** of setting up your environments.
# Unit 5: An Introduction to ML-Agents
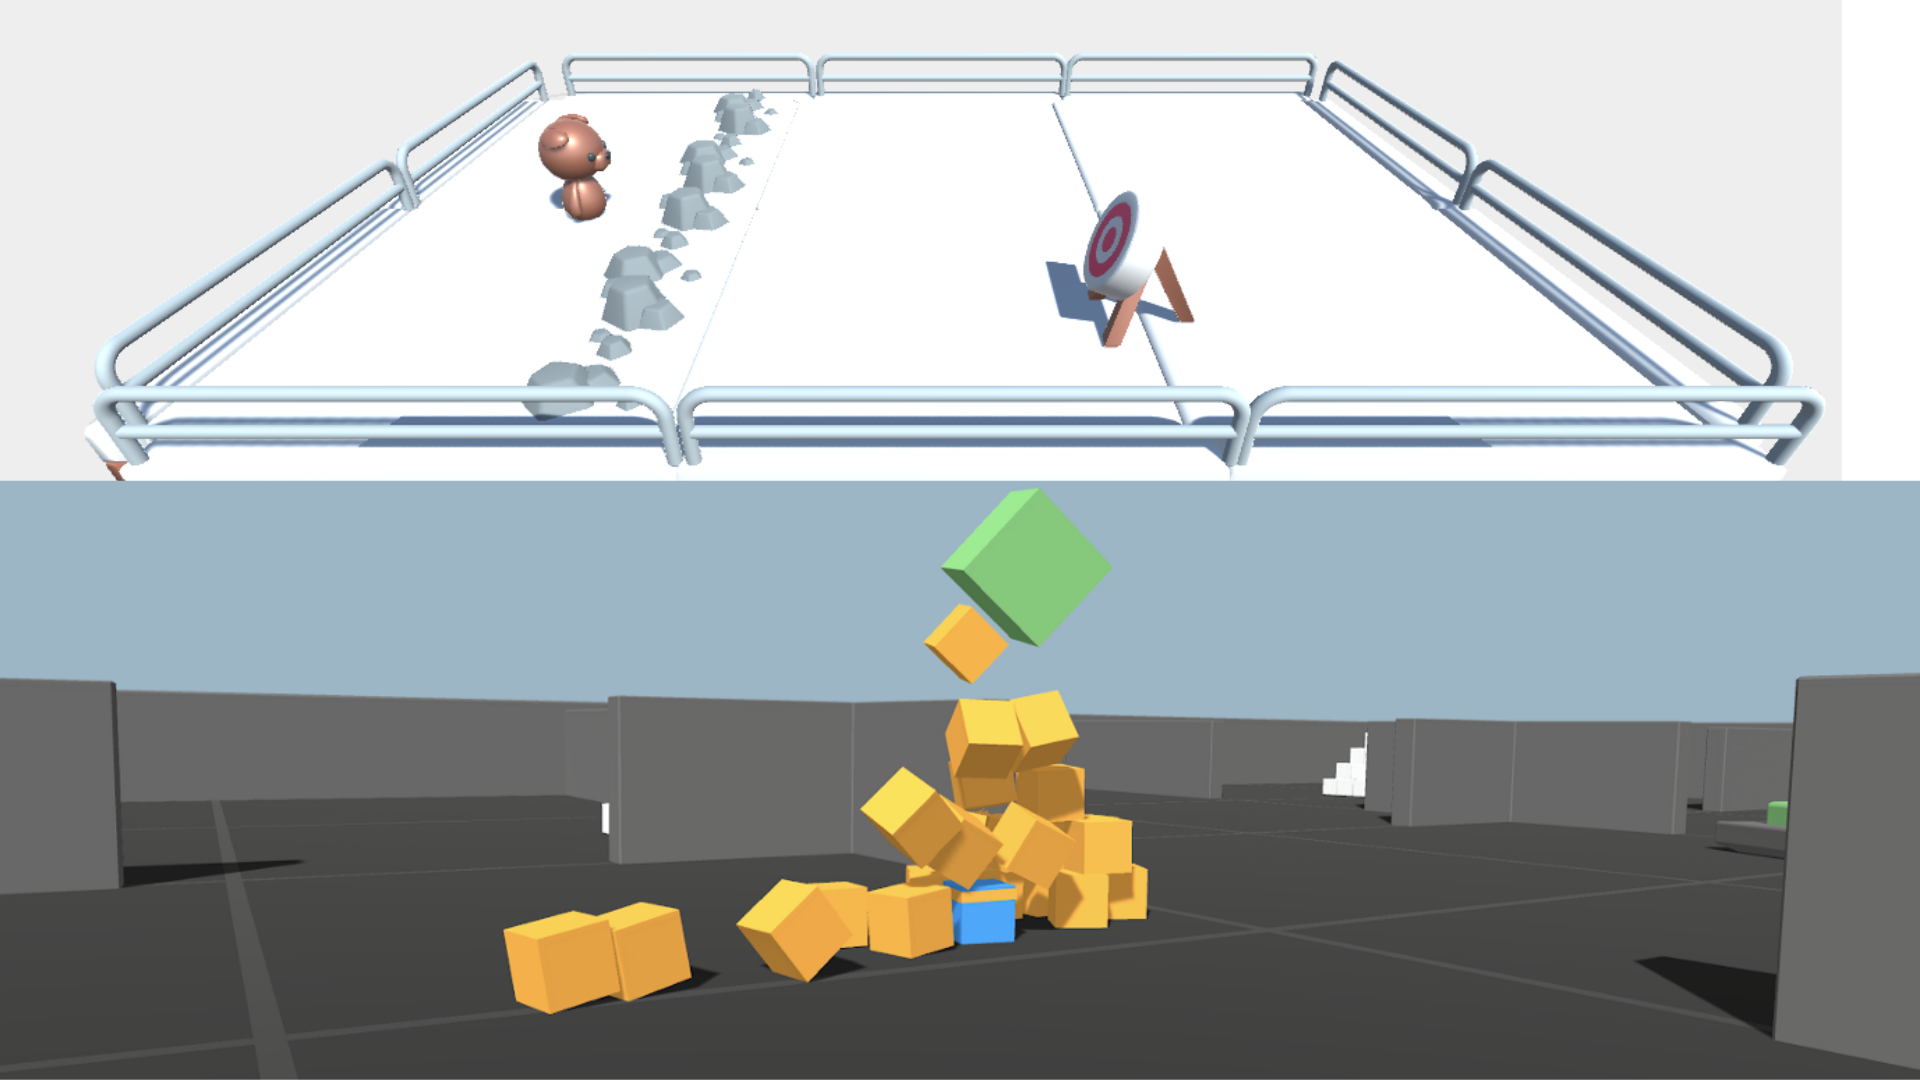
 In this notebook, you'll learn about ML-Agents and train two agents.
- The first one will learn to **shoot snowballs onto spawning targets**.
- The second needs to press a button to spawn a pyramid, then navigate to the pyramid, knock it over, **and move to the gold brick at the top**. To do that, it will need to explore its environment, and we will use a technique called curiosity.
After that, you'll be able **to watch your agents playing directly on your browser**.
For more information about the certification process, check this section 👉 https://huggingface.co/deep-rl-course/en/unit0/introduction#certification-process
⬇️ Here is an example of what **you will achieve at the end of this unit.** ⬇️
In this notebook, you'll learn about ML-Agents and train two agents.
- The first one will learn to **shoot snowballs onto spawning targets**.
- The second needs to press a button to spawn a pyramid, then navigate to the pyramid, knock it over, **and move to the gold brick at the top**. To do that, it will need to explore its environment, and we will use a technique called curiosity.
After that, you'll be able **to watch your agents playing directly on your browser**.
For more information about the certification process, check this section 👉 https://huggingface.co/deep-rl-course/en/unit0/introduction#certification-process
⬇️ Here is an example of what **you will achieve at the end of this unit.** ⬇️

 ### 🎮 Environments:
- [Pyramids](https://github.com/Unity-Technologies/ml-agents/blob/main/docs/Learning-Environment-Examples.md#pyramids)
- SnowballTarget
### 📚 RL-Library:
- [ML-Agents](https://github.com/Unity-Technologies/ml-agents)
We're constantly trying to improve our tutorials, so **if you find some issues in this notebook**, please [open an issue on the GitHub Repo](https://github.com/huggingface/deep-rl-class/issues).
## Objectives of this notebook 🏆
At the end of the notebook, you will:
- Understand how **ML-Agents** works and the environment library.
- Be able to **train agents in Unity Environments**.
## Prerequisites 🏗️
Before diving into the notebook, you need to:
🔲 📚 **Study [what ML-Agents is and how it works by reading Unit 5](https://huggingface.co/deep-rl-course/unit5/introduction)** 🤗
# Let's train our agents 🚀
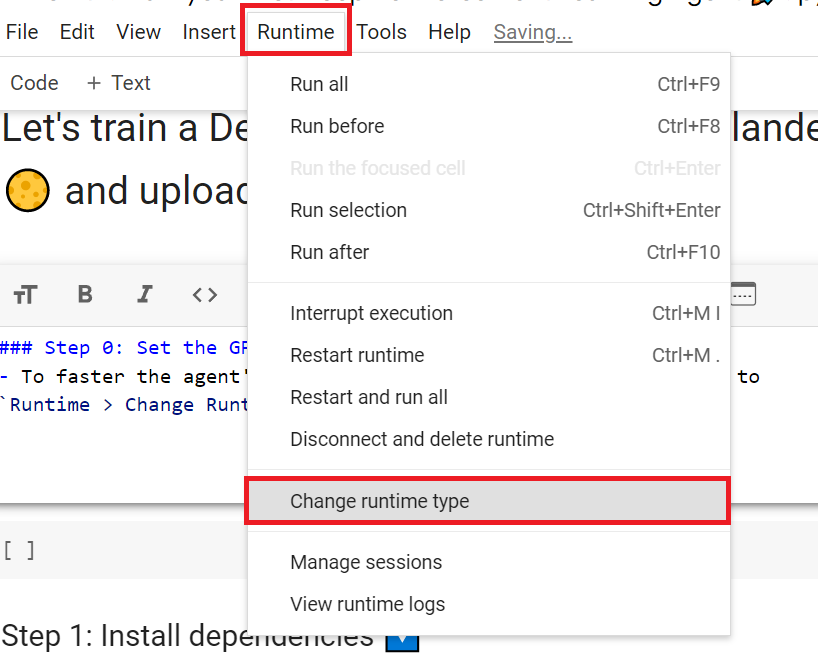
## Set the GPU 💪
- To **accelerate the agent's training, we'll use a GPU**. To do that, go to `Runtime > Change Runtime type`
### 🎮 Environments:
- [Pyramids](https://github.com/Unity-Technologies/ml-agents/blob/main/docs/Learning-Environment-Examples.md#pyramids)
- SnowballTarget
### 📚 RL-Library:
- [ML-Agents](https://github.com/Unity-Technologies/ml-agents)
We're constantly trying to improve our tutorials, so **if you find some issues in this notebook**, please [open an issue on the GitHub Repo](https://github.com/huggingface/deep-rl-class/issues).
## Objectives of this notebook 🏆
At the end of the notebook, you will:
- Understand how **ML-Agents** works and the environment library.
- Be able to **train agents in Unity Environments**.
## Prerequisites 🏗️
Before diving into the notebook, you need to:
🔲 📚 **Study [what ML-Agents is and how it works by reading Unit 5](https://huggingface.co/deep-rl-course/unit5/introduction)** 🤗
# Let's train our agents 🚀
## Set the GPU 💪
- To **accelerate the agent's training, we'll use a GPU**. To do that, go to `Runtime > Change Runtime type`
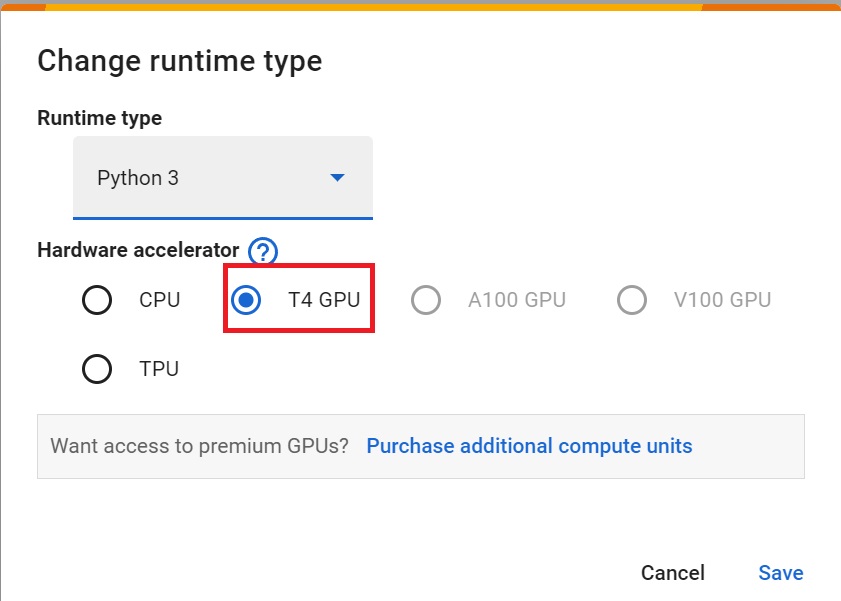
 - `Hardware Accelerator > GPU`
 ## Clone the repository and install the dependencies 🔽
- We need to clone the repository that **contains the experimental version of the library that allows you to push your trained agent to the Hub.**
```bash
# Clone the repository
git clone --depth 1 https://github.com/Unity-Technologies/ml-agents
```
```bash
# Go inside the repository and install the package
cd ml-agents
pip install -e ./ml-agents-envs
pip install -e ./ml-agents
```
## SnowballTarget ⛄
If you need a refresher on how this environment works check this section 👉
https://huggingface.co/deep-rl-course/unit5/snowball-target
### Download and move the environment zip file in `./training-envs-executables/linux/`
- Our environment executable is in a zip file.
- We need to download it and place it to `./training-envs-executables/linux/`
- We use a linux executable because we use colab, and colab machines OS is Ubuntu (linux)
```bash
# Here, we create training-envs-executables and linux
mkdir ./training-envs-executables
mkdir ./training-envs-executables/linux
```
We downloaded the file SnowballTarget.zip from https://github.com/huggingface/Snowball-Target using `wget`
```bash
wget "https://github.com/huggingface/Snowball-Target/raw/main/SnowballTarget.zip" -O ./training-envs-executables/linux/SnowballTarget.zip
```
We unzip the executable.zip file
```bash
unzip -d ./training-envs-executables/linux/ ./training-envs-executables/linux/SnowballTarget.zip
```
Make sure your file is accessible
```bash
chmod -R 755 ./training-envs-executables/linux/SnowballTarget
```
### Define the SnowballTarget config file
- In ML-Agents, you define the **training hyperparameters in config.yaml files.**
There are multiple hyperparameters. To understand them better, you should read the explanation for each one in [the documentation](https://github.com/Unity-Technologies/ml-agents/blob/release_20_docs/docs/Training-Configuration-File.md)
You need to create a `SnowballTarget.yaml` config file in ./content/ml-agents/config/ppo/
We'll give you a preliminary version of this config (to copy and paste into your `SnowballTarget.yaml file`), **but you should modify it**.
```yaml
behaviors:
SnowballTarget:
trainer_type: ppo
summary_freq: 10000
keep_checkpoints: 10
checkpoint_interval: 50000
max_steps: 200000
time_horizon: 64
threaded: true
hyperparameters:
learning_rate: 0.0003
learning_rate_schedule: linear
batch_size: 128
buffer_size: 2048
beta: 0.005
epsilon: 0.2
lambd: 0.95
num_epoch: 3
network_settings:
normalize: false
hidden_units: 256
num_layers: 2
vis_encode_type: simple
reward_signals:
extrinsic:
gamma: 0.99
strength: 1.0
```
## Clone the repository and install the dependencies 🔽
- We need to clone the repository that **contains the experimental version of the library that allows you to push your trained agent to the Hub.**
```bash
# Clone the repository
git clone --depth 1 https://github.com/Unity-Technologies/ml-agents
```
```bash
# Go inside the repository and install the package
cd ml-agents
pip install -e ./ml-agents-envs
pip install -e ./ml-agents
```
## SnowballTarget ⛄
If you need a refresher on how this environment works check this section 👉
https://huggingface.co/deep-rl-course/unit5/snowball-target
### Download and move the environment zip file in `./training-envs-executables/linux/`
- Our environment executable is in a zip file.
- We need to download it and place it to `./training-envs-executables/linux/`
- We use a linux executable because we use colab, and colab machines OS is Ubuntu (linux)
```bash
# Here, we create training-envs-executables and linux
mkdir ./training-envs-executables
mkdir ./training-envs-executables/linux
```
We downloaded the file SnowballTarget.zip from https://github.com/huggingface/Snowball-Target using `wget`
```bash
wget "https://github.com/huggingface/Snowball-Target/raw/main/SnowballTarget.zip" -O ./training-envs-executables/linux/SnowballTarget.zip
```
We unzip the executable.zip file
```bash
unzip -d ./training-envs-executables/linux/ ./training-envs-executables/linux/SnowballTarget.zip
```
Make sure your file is accessible
```bash
chmod -R 755 ./training-envs-executables/linux/SnowballTarget
```
### Define the SnowballTarget config file
- In ML-Agents, you define the **training hyperparameters in config.yaml files.**
There are multiple hyperparameters. To understand them better, you should read the explanation for each one in [the documentation](https://github.com/Unity-Technologies/ml-agents/blob/release_20_docs/docs/Training-Configuration-File.md)
You need to create a `SnowballTarget.yaml` config file in ./content/ml-agents/config/ppo/
We'll give you a preliminary version of this config (to copy and paste into your `SnowballTarget.yaml file`), **but you should modify it**.
```yaml
behaviors:
SnowballTarget:
trainer_type: ppo
summary_freq: 10000
keep_checkpoints: 10
checkpoint_interval: 50000
max_steps: 200000
time_horizon: 64
threaded: true
hyperparameters:
learning_rate: 0.0003
learning_rate_schedule: linear
batch_size: 128
buffer_size: 2048
beta: 0.005
epsilon: 0.2
lambd: 0.95
num_epoch: 3
network_settings:
normalize: false
hidden_units: 256
num_layers: 2
vis_encode_type: simple
reward_signals:
extrinsic:
gamma: 0.99
strength: 1.0
```

 As an experiment, try to modify some other hyperparameters. Unity provides very [good documentation explaining each of them here](https://github.com/Unity-Technologies/ml-agents/blob/main/docs/Training-Configuration-File.md).
Now that you've created the config file and understand what most hyperparameters do, we're ready to train our agent 🔥.
### Train the agent
To train our agent, we need to **launch mlagents-learn and select the executable containing the environment.**
We define four parameters:
1. `mlagents-learn `: the path where the hyperparameter config file is.
2. `--env`: where the environment executable is.
3. `--run_id`: the name you want to give to your training run id.
4. `--no-graphics`: to not launch the visualization during the training.
As an experiment, try to modify some other hyperparameters. Unity provides very [good documentation explaining each of them here](https://github.com/Unity-Technologies/ml-agents/blob/main/docs/Training-Configuration-File.md).
Now that you've created the config file and understand what most hyperparameters do, we're ready to train our agent 🔥.
### Train the agent
To train our agent, we need to **launch mlagents-learn and select the executable containing the environment.**
We define four parameters:
1. `mlagents-learn `: the path where the hyperparameter config file is.
2. `--env`: where the environment executable is.
3. `--run_id`: the name you want to give to your training run id.
4. `--no-graphics`: to not launch the visualization during the training.
 Train the model and use the `--resume` flag to continue training in case of interruption.
> It will fail the first time if and when you use `--resume`. Try rerunning the block to bypass the error.
The training will take 10 to 35min depending on your config. Go take a ☕️ you deserve it 🤗.
```bash
mlagents-learn ./config/ppo/SnowballTarget.yaml --env=./training-envs-executables/linux/SnowballTarget/SnowballTarget --run-id="SnowballTarget1" --no-graphics
```
### Push the agent to the Hugging Face Hub
- Now that we've trained our agent, we’re **ready to push it to the Hub and visualize it playing on your browser🔥.**
To be able to share your model with the community, there are three more steps to follow:
1️⃣ (If it's not already done) create an account to HF ➡ https://huggingface.co/join
2️⃣ Sign in and store your authentication token from the Hugging Face website.
- Create a new token (https://huggingface.co/settings/tokens) **with write role**
Train the model and use the `--resume` flag to continue training in case of interruption.
> It will fail the first time if and when you use `--resume`. Try rerunning the block to bypass the error.
The training will take 10 to 35min depending on your config. Go take a ☕️ you deserve it 🤗.
```bash
mlagents-learn ./config/ppo/SnowballTarget.yaml --env=./training-envs-executables/linux/SnowballTarget/SnowballTarget --run-id="SnowballTarget1" --no-graphics
```
### Push the agent to the Hugging Face Hub
- Now that we've trained our agent, we’re **ready to push it to the Hub and visualize it playing on your browser🔥.**
To be able to share your model with the community, there are three more steps to follow:
1️⃣ (If it's not already done) create an account to HF ➡ https://huggingface.co/join
2️⃣ Sign in and store your authentication token from the Hugging Face website.
- Create a new token (https://huggingface.co/settings/tokens) **with write role**
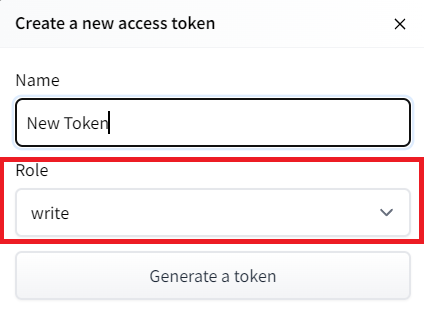 - Copy the token
- Run the cell below and paste the token
```python
from huggingface_hub import notebook_login
notebook_login()
```
If you don't want to use Google Colab or a Jupyter Notebook, you need to use this command instead: `huggingface-cli login`
Then we need to run `mlagents-push-to-hf`.
And we define four parameters:
1. `--run-id`: the name of the training run id.
2. `--local-dir`: where the agent was saved, it’s results/, so in my case results/First Training.
3. `--repo-id`: the name of the Hugging Face repo you want to create or update. It’s always /
If the repo does not exist **it will be created automatically**
4. `--commit-message`: since HF repos are git repositories you need to give a commit message.
- Copy the token
- Run the cell below and paste the token
```python
from huggingface_hub import notebook_login
notebook_login()
```
If you don't want to use Google Colab or a Jupyter Notebook, you need to use this command instead: `huggingface-cli login`
Then we need to run `mlagents-push-to-hf`.
And we define four parameters:
1. `--run-id`: the name of the training run id.
2. `--local-dir`: where the agent was saved, it’s results/, so in my case results/First Training.
3. `--repo-id`: the name of the Hugging Face repo you want to create or update. It’s always /
If the repo does not exist **it will be created automatically**
4. `--commit-message`: since HF repos are git repositories you need to give a commit message.
 For instance:
`mlagents-push-to-hf --run-id="SnowballTarget1" --local-dir="./results/SnowballTarget1" --repo-id="ThomasSimonini/ppo-SnowballTarget" --commit-message="First Push"`
```python
mlagents-push-to-hf --run-id= # Add your run id --local-dir= # Your local dir --repo-id= # Your repo id --commit-message= # Your commit message
```
If everything worked you should see this at the end of the process (but with a different url 😆) :
```
Your model is pushed to the hub. You can view your model here: https://huggingface.co/ThomasSimonini/ppo-SnowballTarget
```
It's the link to your model. It contains a model card that explains how to use it, your Tensorboard, and your config file. **What's awesome is that it's a git repository, which means you can have different commits, update your repository with a new push, etc.**
But now comes the best: **being able to visualize your agent online 👀.**
### Watch your agent playing 👀
This step it's simple:
1. Remember your repo-id
2. Go here: https://huggingface.co/spaces/ThomasSimonini/ML-Agents-SnowballTarget
3. Launch the game and put it in full screen by clicking on the bottom right button
For instance:
`mlagents-push-to-hf --run-id="SnowballTarget1" --local-dir="./results/SnowballTarget1" --repo-id="ThomasSimonini/ppo-SnowballTarget" --commit-message="First Push"`
```python
mlagents-push-to-hf --run-id= # Add your run id --local-dir= # Your local dir --repo-id= # Your repo id --commit-message= # Your commit message
```
If everything worked you should see this at the end of the process (but with a different url 😆) :
```
Your model is pushed to the hub. You can view your model here: https://huggingface.co/ThomasSimonini/ppo-SnowballTarget
```
It's the link to your model. It contains a model card that explains how to use it, your Tensorboard, and your config file. **What's awesome is that it's a git repository, which means you can have different commits, update your repository with a new push, etc.**
But now comes the best: **being able to visualize your agent online 👀.**
### Watch your agent playing 👀
This step it's simple:
1. Remember your repo-id
2. Go here: https://huggingface.co/spaces/ThomasSimonini/ML-Agents-SnowballTarget
3. Launch the game and put it in full screen by clicking on the bottom right button
 1. In step 1, choose your model repository, which is the model id (in my case ThomasSimonini/ppo-SnowballTarget).
2. In step 2, **choose what model you want to replay**:
- I have multiple ones since we saved a model every 500000 timesteps.
- But if I want the more recent I choose `SnowballTarget.onnx`
👉 It's nice to **try different model stages to see the improvement of the agent.**
And don't hesitate to share the best score your agent gets on discord in the #rl-i-made-this channel 🔥
Now let's try a more challenging environment called Pyramids.
## Pyramids 🏆
### Download and move the environment zip file in `./training-envs-executables/linux/`
- Our environment executable is in a zip file.
- We need to download it and place it into `./training-envs-executables/linux/`
- We use a linux executable because we're using colab, and the colab machine's OS is Ubuntu (linux)
Download the file Pyramids.zip from https://drive.google.com/uc?export=download&id=1UiFNdKlsH0NTu32xV-giYUEVKV4-vc7H using `wget`. Check out the full solution to download large files from GDrive [here](https://bcrf.biochem.wisc.edu/2021/02/05/download-google-drive-files-using-wget/)
```python
!wget --load-cookies /tmp/cookies.txt "https://docs.google.com/uc?export=download&confirm=$(wget --quiet --save-cookies /tmp/cookies.txt --keep-session-cookies --no-check-certificate 'https://docs.google.com/uc?export=download&id=1UiFNdKlsH0NTu32xV-giYUEVKV4-vc7H' -O- | sed -rn 's/.*confirm=([0-9A-Za-z_]+).*/\1\n/p')&id=1UiFNdKlsH0NTu32xV-giYUEVKV4-vc7H" -O ./training-envs-executables/linux/Pyramids.zip && rm -rf /tmp/cookies.txt
```
Unzip it
```python
%%capture
!unzip -d ./training-envs-executables/linux/ ./training-envs-executables/linux/Pyramids.zip
```
Make sure your file is accessible
```bash
chmod -R 755 ./training-envs-executables/linux/Pyramids/Pyramids
```
### Modify the PyramidsRND config file
- Contrary to the first environment, which was a custom one, **Pyramids was made by the Unity team**.
- So the PyramidsRND config file already exists and is in ./content/ml-agents/config/ppo/PyramidsRND.yaml
- You might ask why "RND" is in PyramidsRND. RND stands for *random network distillation* it's a way to generate curiosity rewards. If you want to know more about that, we wrote an article explaining this technique: https://medium.com/data-from-the-trenches/curiosity-driven-learning-through-random-network-distillation-488ffd8e5938
For this training, we’ll modify one thing:
- The total training steps hyperparameter is too high since we can hit the benchmark (mean reward = 1.75) in only 1M training steps.
👉 To do that, we go to config/ppo/PyramidsRND.yaml,**and change max_steps to 1000000.**
1. In step 1, choose your model repository, which is the model id (in my case ThomasSimonini/ppo-SnowballTarget).
2. In step 2, **choose what model you want to replay**:
- I have multiple ones since we saved a model every 500000 timesteps.
- But if I want the more recent I choose `SnowballTarget.onnx`
👉 It's nice to **try different model stages to see the improvement of the agent.**
And don't hesitate to share the best score your agent gets on discord in the #rl-i-made-this channel 🔥
Now let's try a more challenging environment called Pyramids.
## Pyramids 🏆
### Download and move the environment zip file in `./training-envs-executables/linux/`
- Our environment executable is in a zip file.
- We need to download it and place it into `./training-envs-executables/linux/`
- We use a linux executable because we're using colab, and the colab machine's OS is Ubuntu (linux)
Download the file Pyramids.zip from https://drive.google.com/uc?export=download&id=1UiFNdKlsH0NTu32xV-giYUEVKV4-vc7H using `wget`. Check out the full solution to download large files from GDrive [here](https://bcrf.biochem.wisc.edu/2021/02/05/download-google-drive-files-using-wget/)
```python
!wget --load-cookies /tmp/cookies.txt "https://docs.google.com/uc?export=download&confirm=$(wget --quiet --save-cookies /tmp/cookies.txt --keep-session-cookies --no-check-certificate 'https://docs.google.com/uc?export=download&id=1UiFNdKlsH0NTu32xV-giYUEVKV4-vc7H' -O- | sed -rn 's/.*confirm=([0-9A-Za-z_]+).*/\1\n/p')&id=1UiFNdKlsH0NTu32xV-giYUEVKV4-vc7H" -O ./training-envs-executables/linux/Pyramids.zip && rm -rf /tmp/cookies.txt
```
Unzip it
```python
%%capture
!unzip -d ./training-envs-executables/linux/ ./training-envs-executables/linux/Pyramids.zip
```
Make sure your file is accessible
```bash
chmod -R 755 ./training-envs-executables/linux/Pyramids/Pyramids
```
### Modify the PyramidsRND config file
- Contrary to the first environment, which was a custom one, **Pyramids was made by the Unity team**.
- So the PyramidsRND config file already exists and is in ./content/ml-agents/config/ppo/PyramidsRND.yaml
- You might ask why "RND" is in PyramidsRND. RND stands for *random network distillation* it's a way to generate curiosity rewards. If you want to know more about that, we wrote an article explaining this technique: https://medium.com/data-from-the-trenches/curiosity-driven-learning-through-random-network-distillation-488ffd8e5938
For this training, we’ll modify one thing:
- The total training steps hyperparameter is too high since we can hit the benchmark (mean reward = 1.75) in only 1M training steps.
👉 To do that, we go to config/ppo/PyramidsRND.yaml,**and change max_steps to 1000000.**
 As an experiment, you should also try to modify some other hyperparameters. Unity provides very [good documentation explaining each of them here](https://github.com/Unity-Technologies/ml-agents/blob/main/docs/Training-Configuration-File.md).
We’re now ready to train our agent 🔥.
### Train the agent
The training will take 30 to 45min depending on your machine, go take a ☕️ you deserve it 🤗.
```python
mlagents-learn ./config/ppo/PyramidsRND.yaml --env=./training-envs-executables/linux/Pyramids/Pyramids --run-id="Pyramids Training" --no-graphics
```
### Push the agent to the Hugging Face Hub
- Now that we trained our agent, we’re **ready to push it to the Hub to be able to visualize it playing on your browser🔥.**
```python
mlagents-push-to-hf --run-id= # Add your run id --local-dir= # Your local dir --repo-id= # Your repo id --commit-message= # Your commit message
```
### Watch your agent playing 👀
👉 https://huggingface.co/spaces/unity/ML-Agents-Pyramids
### 🎁 Bonus: Why not train on another environment?
Now that you know how to train an agent using MLAgents, **why not try another environment?**
MLAgents provides 17 different environments and we’re building some custom ones. The best way to learn is to try things on your own, have fun.
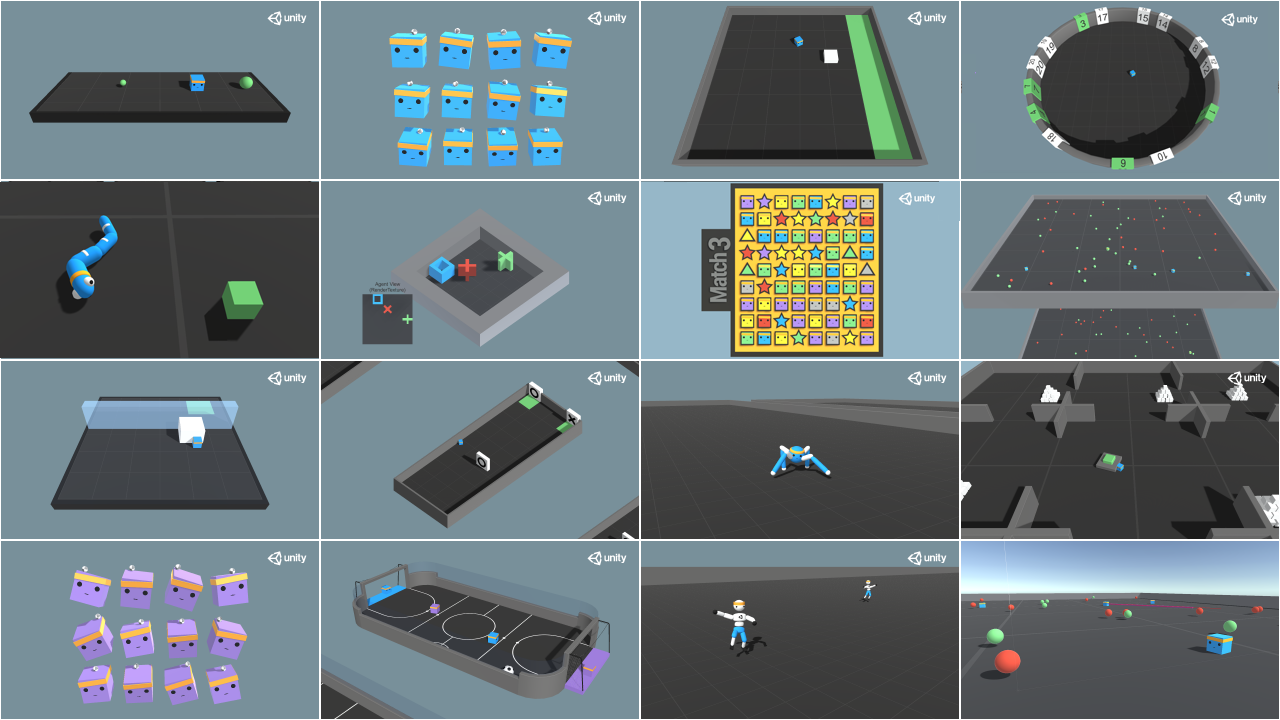
You have the full list of the one currently available environments on Hugging Face here 👉 https://github.com/huggingface/ml-agents#the-environments
For the demos to visualize your agent 👉 https://huggingface.co/unity
For now we have integrated:
- [Worm](https://huggingface.co/spaces/unity/ML-Agents-Worm) demo where you teach a **worm to crawl**.
- [Walker](https://huggingface.co/spaces/unity/ML-Agents-Walker) demo where you teach an agent **to walk towards a goal**.
That’s all for today. Congrats on finishing this tutorial!
The best way to learn is to practice and try stuff. Why not try another environment? ML-Agents has 18 different environments, but you can also create your own. Check the documentation and have fun!
See you on Unit 6 🔥,
## Keep Learning, Stay awesome 🤗
As an experiment, you should also try to modify some other hyperparameters. Unity provides very [good documentation explaining each of them here](https://github.com/Unity-Technologies/ml-agents/blob/main/docs/Training-Configuration-File.md).
We’re now ready to train our agent 🔥.
### Train the agent
The training will take 30 to 45min depending on your machine, go take a ☕️ you deserve it 🤗.
```python
mlagents-learn ./config/ppo/PyramidsRND.yaml --env=./training-envs-executables/linux/Pyramids/Pyramids --run-id="Pyramids Training" --no-graphics
```
### Push the agent to the Hugging Face Hub
- Now that we trained our agent, we’re **ready to push it to the Hub to be able to visualize it playing on your browser🔥.**
```python
mlagents-push-to-hf --run-id= # Add your run id --local-dir= # Your local dir --repo-id= # Your repo id --commit-message= # Your commit message
```
### Watch your agent playing 👀
👉 https://huggingface.co/spaces/unity/ML-Agents-Pyramids
### 🎁 Bonus: Why not train on another environment?
Now that you know how to train an agent using MLAgents, **why not try another environment?**
MLAgents provides 17 different environments and we’re building some custom ones. The best way to learn is to try things on your own, have fun.

You have the full list of the one currently available environments on Hugging Face here 👉 https://github.com/huggingface/ml-agents#the-environments
For the demos to visualize your agent 👉 https://huggingface.co/unity
For now we have integrated:
- [Worm](https://huggingface.co/spaces/unity/ML-Agents-Worm) demo where you teach a **worm to crawl**.
- [Walker](https://huggingface.co/spaces/unity/ML-Agents-Walker) demo where you teach an agent **to walk towards a goal**.
That’s all for today. Congrats on finishing this tutorial!
The best way to learn is to practice and try stuff. Why not try another environment? ML-Agents has 18 different environments, but you can also create your own. Check the documentation and have fun!
See you on Unit 6 🔥,
## Keep Learning, Stay awesome 🤗