<![CDATA[使用DigitalOcean搭建ShadowSocks及其优化]]> /2017/12/03/%E4%BD%BF%E7%94%A8DigitalOcean%E6%90%AD%E5%BB%BAShadowSocks%E5%8F%8A%E5%85%B6%E4%BC%98%E5%8C%96/ 前言

在github的教育资助下买了DigitalOcean的服务器,送了50刀,不错啊,其实用别人的邀请码可以再多10刀的。

一直看朋友自己塔梯子,挺好用的,刚好买了vps,就琢磨着干脆自己来搭个梯子。

本文将包括一下内容:

  1. DigitalOcean注册与配置
  2. 服务器端ss配置
  3. bbr加速

一. 概念介绍

DigitalOcean(以下简称DO)是美国的一家云主机提供商,其目前拥有包括美国(纽约、旧金山)、荷兰阿姆斯特丹、新加坡、英国伦敦、德国法兰克福、加拿大多伦多和印度班加罗尔共8个城市12个可选机房节点。其采用KVM虚拟机,配置高性能的SSD做储存,拥有IPv6可选项,加上服务器配备的是1000M端口,以512M内存为起点,再加上DO较低的价格$5起/月(而且还有其他方式可以获得优惠,下面会讲到),受到很多的追捧。选用这么一个主机不仅可以用来搭建ss,有一定网页制作基础的同学也可以搭建自己的个人网站,甚至可以选择DO提供的高级套餐来进行机器学习等大规模云计算。

Shadowsocks 是由大神 clowwindy(传说是妹纸)开发的一款基于SSH的通讯方式,或者理解为SSH的一个变种。简单来说,其原理就是在墙的两边分别建立起ssh-local和ssh-server两个端口,用户PC首先基于Socks5协议与ssh-local进行通讯,其信息由ssh-local进行多种可选方式的加密后通过墙与另一侧的ssh-server通讯,该信息由ssh-server解密后再对真正的目标地址进行请求。因为ssh-local与ssh-server之间的加密理论无法解密且不含特征信息,就是普通的TCP包,因此无法被捕获或拦截。由于该程序实在太过优秀,因此作者本人被请去喝了茶后就把github上的项目删去了,只留下一句:

Removed according to regulations.

ps:以上是cope的。

二. DigitalOcean注册与购买

DigitalOcean的官网目前在中国大陆可以正常访问,欢迎通过我的邀请链接进行注册.即获得10美元的优惠。现在最低价为5美元/月,因此可以说得到了免费两个月的额度。之后如果您付款超过$25美元,我也会得到网站一定的奖励,是个互惠互利的事儿:)

1.首先在主页即可注册:DigitalOcean官网 我的邀请链接可以得到10美金

注测后添加付款方式:需要绑定“VISA信用卡”或“PayPal账户”用于付款。采用绑定“VISA信用卡”的方式,会先从账户中扣除1刀,10分钟左右返还,确定账户的可以付款,不需要提前付费;采用绑定“PayPal账户”的方式,必须首先至少充值5刀。

2.创建“Droplet”虚拟机

  • 推荐的配置如下:

1.镜像和大小的选择

注:DigitalOcean是Shadowsocks Wiki上推荐的VPS之一,
同时Ubuntu是推荐的系统,
详情参见 Shadowsocks 使用说明中的“服务器搭建”。

2.选择服务器所在地区

服务器地址可从DigitalOcean测速网址进行测速。

3.其他

  • 勾选IPv6。IPv6可用于连接教育网的PT站等。
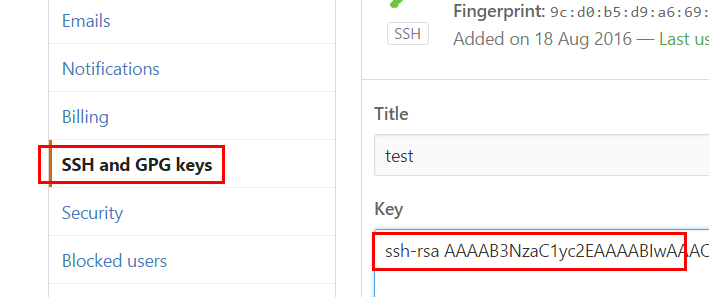
  • 添加SSH公钥,用于SSH远程连接主机。生成密钥的命令为ssh-keygen -t rsa -C “yourmail”。

4.最后

可以取个名字

二、服务器端ss配置

如果没有配置ssh 你会发现自己的邮箱收到如下的一封邮件告诉了你IP地址(IP Address)、用户名(Username)和初始密码(Password)
如果配置了ssh,就可以直接登陆。

ssh root@IP

1.服务器端安装SS

1
2
3
4
5
apt-get update // 更新源中包列表
apt-get install python-pip // 安装pip
pip install --upgrade pip // 更新pip
apt-get install git
pip install git+https://github.com/shadowsocks/shadowsocks.git@master // 安装SS

2.安装chacha20加密

虽然shadowsocks的作者推荐使用aes-256-cfb的加密算法,但是这个算法对手机或者openwrt路由器的压力还是不小的,于是后来Google推出的chacha20算法因为其安全性和惊人的速度被现在更多人使用。

1
2
3
4
5
6
apt-get install build-essential
wget https://github.com/jedisct1/libsodium/releases/download/1.0.8/libsodium-1.0.8.tar.gz
tar xf libsodium-1.0.8.tar.gz && cd libsodium-1.0.8
./configure && make -j2
make install
ldconfig

3.服务器端配置

  • 配置shadowsocks文件
    1
    vim /etc/shadowsocks.json

这是shadowsocks.json的详情:

1
2
3
4
5
6
7
8
9
10
11
{
"server": "服务器的ip",
"server_port": 8388,
"local_address": "127.0.0.1",
"local_port": 1080,
"password": "你的密码",
"timeout": 300,
"method": "chacha20",
"fast_open": false
}

  • 服务器端启动与停止(一直启动即可)
    1
    2
    ssserver -c /etc/shadowsocks.json -d start
    ssserver -c /etc/shadowsocks.json -d stop

三、BBR加速

TCP-BBR:Linux的内核必须是4.9.0-rc8 内核及以后的版本 才能开启,而锐速并不支持这个最新的内核版本,所以TCP-BBR和锐速是不能共存的。

1.查看系统

uname -m

使用这个命令会返回你的系统位数,如果是 x86_64 那就是64位,如果是 i386 或 386 或 i686 或 686 那就是32位。

2.下载内核文件

  • 64位系统
1
wget -O linux-image-4.10.1-amd64.deb http://kernel.ubuntu.com/~kernel-ppa/mainline/v4.10.1/linux-image-4.10.1-041001-generic_4.10.1-041001.201702260735_amd64.deb
  • 32位系统
1
wget -O linux-image-4.10.1-i386.deb http://kernel.ubuntu.com/~kernel-ppa/mainline/v4.10.1/linux-image-4.10.1-041001-generic_4.10.1-041001.201702260735_i386.deb

下载完是这样的:

1
2
3
4
5
6
7
8
9
10
11
12
13
14
# VPS提示(64位)
root@bbr1:~# wget -O linux-image-4.10.1-amd64.deb http://kernel.ubuntu.com/~kernel-ppa/mainline/v4.10.1/linux-image-4.10.1-041001-generic_4.10.1-041001.201702260735_amd64.deb
converted 'http://kernel.ubuntu.com/~kernel-ppa/mainline/v4.10.1/linux-image-4.10.1-041001-generic_4.10.1-041001.201702260735_amd64.deb' (ANSI_X3.4-1968) -> 'http://kernel.ubuntu.com/~kernel-ppa/mainline/v4.9-rc8/linux-image-4.10.1-040900rc8-generic_4.10.1-040900rc8.201612051443_amd64.deb' (UTF-8)
--2016-12-08 15:31:16-- http://kernel.ubuntu.com/~kernel-ppa/mainline/v4.9/linux-image-4.10.1-040900-generic_4.10.1-040900.201612111631_amd64.deb
Resolving kernel.ubuntu.com (kernel.ubuntu.com)... 91.189.94.216
Connecting to kernel.ubuntu.com (kernel.ubuntu.com)|91.189.94.216|:80... connected.
HTTP request sent, awaiting response... 200 OK
Length: 60489324 (58M) [application/x-debian-package]
Saving to: 'linux-image-4.10.1-amd64.deb'
linux-image-4.10.1-040900 100%[=====================================>] 57.69M 3.02MB/s in 14s
2016-12-08 15:31:31 (4.05 MB/s) - 'linux-image-4.10.1-amd64.deb' saved [60489324/60489324]

3.安装内核

  • 64位系统

    dpkg -i linux-image-4.10.1-amd64.deb

  • 32位系统

    dpkg -i linux-image-4.10.1-i386.deb

安装成功:

1
2
3
4
5
6
7
8
9
10
11
12
13
14
15
16
17
18
19
20
21
22
# VPS提示
root@bbr1:~# dpkg -i linux-image-4.10.1-amd64.deb
Selecting previously unselected package linux-image-4.10.1-040900rc8-generic.
(Reading database ... 25141 files and directories currently installed.)
Preparing to unpack linux-image-4.10.1-040900rc8-generic_4.10.1-040900rc8.201612051443_amd64.deb ...
Done.
Unpacking linux-image-4.10.1-040900rc8-generic (4.10.1-040900rc8.201612051443) ...
Setting up linux-image-4.10.1-040900rc8-generic (4.10.1-040900rc8.201612051443) ...
Running depmod.
update-initramfs: deferring update (hook will be called later)
Examining /etc/kernel/postinst.d.
run-parts: executing /etc/kernel/postinst.d/apt-auto-removal 4.10.1-040900rc8-generic /boot/vmlinuz-4.10.1-040900rc8-generic
run-parts: executing /etc/kernel/postinst.d/initramfs-tools 4.10.1-040900rc8-generic /boot/vmlinuz-4.10.1-040900rc8-generic
update-initramfs: Generating /boot/initrd.img-4.10.1-040900rc8-generic
run-parts: executing /etc/kernel/postinst.d/zz-update-grub 4.10.1-040900rc8-generic /boot/vmlinuz-4.10.1-040900rc8-generic
Generating grub configuration file ...
Found linux image: /boot/vmlinuz-4.10.1-040900rc8-generic
Found initrd image: /boot/initrd.img-4.10.1-040900rc8-generic
Found linux image: /boot/vmlinuz-3.16.0-4-amd64
Found initrd image: /boot/initrd.img-3.16.0-4-amd64
done

4.列出并删除旧内核

列出VPS 除了刚才安装的内核以外的 所有内核名称:
ps:这个代码是排除了刚才安装的内核,所以不会显示刚才安装的那个内核。删除了多余的内核后,就会什么都不显示!

dpkg -l|grep linux-image | awk '{print $2}' | grep -v 'linux-image-[4-9].[0-9]*.'
1
2
3
root@bbr1:~# dpkg -l|grep linux-image | awk '{print $2}' | grep -v 'linux-image-[4-9].[0-9]*.'
linux-image-3.16.0-4-amd64
linux-image-amd64

删除旧内核:

apt-get purge 旧内核名称
1
2
3
4
5
# !!!!示例!!!!
# 比如我是有这两个内核,所以我把这两个删掉,不要照着我的这个步骤做,自己换成你VPS的内核名称!!!
apt-get purge linux-image-3.16.0-4-amd64
apt-get purge linux-image-amd64
# !!!!示例!!!!

5.更新 grub 系统引导文件并重启VPS

1
2
3
4
# 更新系统引导文件
update-grub
# 重启VPS,执行后SSH链接会断开,等十几秒再重新连接继续执行下面的启动命令。
reboot
1
2
3
4
5
6
7
# VPS提示
root@bbr1:~# update-grub
Generating grub configuration file ...
Found linux image: /boot/vmlinuz-4.10.1-040900rc8-generic
Found initrd image: /boot/initrd.img-4.10.1-040900rc8-generic
done

6.开启bbr

1
2
3
4
echo "net.core.default_qdisc=fq" >> /etc/sysctl.conf
echo "net.ipv4.tcp_congestion_control=bbr" >> /etc/sysctl.conf
# 执行这个保存生效更改。
sysctl -p
1
2
3
4
5
6
# VPS提示
root@bbr1:~# sysctl -p
net.ipv6.conf.all.accept_ra = 2
net.core.default_qdisc = fq
net.ipv4.tcp_congestion_control = bbr

7.关闭bbr

1
2
3
4
5
sed -i '/net\.core\.default_qdisc=fq/d' /etc/sysctl.conf && sed -i '/net\.ipv4\.tcp_congestion_control=bbr/d' /etc/sysctl.conf
sysctl -p
#执行完上面的代码,就使用reboot重启VPS后才能关闭bbr,重启后再用下面的查看bbr状态代码,查看是否关闭了。
reboot

8.查看bbr是否开启

  • 执行下面命令,如果结果中有bbr,即证明你的内核已开启bbr。

    sysctl net.ipv4.tcp_available_congestion_control

  • 执行下面命令,看到有 tcp_bbr 模块,即说明bbr已启动

    lsmod | grep bbr

1
2
3
4
5
6
7
8
# VPS提示
root@bbr1:~# sysctl net.ipv4.tcp_available_congestion_control
net.ipv4.tcp_available_congestion_control = bbr cubic reno
# ================================================
root@bbr1:~# lsmod | grep bbr
tcp_bbr 20480 0

这样就可以快乐的翻墙出去观看世界了 ^_^

]]>
<![CDATA[ubuntu强制清除垃圾回收站]]> /2017/11/22/ubuntu%E5%BC%BA%E5%88%B6%E6%B8%85%E9%99%A4%E5%9E%83%E5%9C%BE%E5%9B%9E%E6%94%B6%E7%AB%99/ 强制清除垃圾回收站

问题

我遇到了无法在Ubuntu 16.04中清空回收站的问题。我右键回收站图标并选择清空回收站,就像我一直做的那样。我看到进度条显示删除文件中过了一段时间。但是它停止了,垃圾站中有些文件删除了,但有些文件还是没有删除。在看了文件夹后原来没有权限。

方案

Ubuntu 16.04的回收站路径为

1
$HOME/.local/share/Trash/

然后用以下命令即可清空回收站

1
sudo rm -fr $HOME/.local/share/Trash/files/*
]]>
linux unbuntu linux,垃圾站
<![CDATA[ubuntu配置]]> /2017/10/29/ubuntu%E9%85%8D%E7%BD%AE/ ubuntu16.04安装后配置

0.更新源

更换阿里云的源

1
2
3
4
5
6
7
8
9
10
11
12
13
14
15
16
17
18
19
20
21
22
23
24
25
26
27
28
29
30
31
32
33
34
35
36
37
38
39
40
41
42
43
44
45
46
47
48
49
50
51
# deb cdrom:[Ubuntu 16.04.3 LTS _Xenial Xerus_ - Release amd64 (20170801)]/ xenial main restricted
# See http://help.ubuntu.com/community/UpgradeNotes for how to upgrade to
# newer versions of the distribution.
deb http://mirrors.aliyun.com/ubuntu/ xenial main restricted
# deb-src http://cn.archive.ubuntu.com/ubuntu/ xenial main restricted
## Major bug fix updates produced after the final release of the
## distribution.
deb http://mirrors.aliyun.com/ubuntu/ xenial-updates main restricted
# deb-src http://cn.archive.ubuntu.com/ubuntu/ xenial-updates main restricted
## N.B. software from this repository is ENTIRELY UNSUPPORTED by the Ubuntu
## team. Also, please note that software in universe WILL NOT receive any
## review or updates from the Ubuntu security team.
deb http://mirrors.aliyun.com/ubuntu/ xenial universe
# deb-src http://cn.archive.ubuntu.com/ubuntu/ xenial universe
deb http://mirrors.aliyun.com/ubuntu/ xenial-updates universe
# deb-src http://cn.archive.ubuntu.com/ubuntu/ xenial-updates universe
## N.B. software from this repository is ENTIRELY UNSUPPORTED by the Ubuntu
## team, and may not be under a free licence. Please satisfy yourself as to
## your rights to use the software. Also, please note that software in
## multiverse WILL NOT receive any review or updates from the Ubuntu
## security team.
deb http://mirrors.aliyun.com/ubuntu/ xenial multiverse
# deb-src http://cn.archive.ubuntu.com/ubuntu/ xenial multiverse
deb http://mirrors.aliyun.com/ubuntu/ xenial-updates multiverse
# deb-src http://cn.archive.ubuntu.com/ubuntu/ xenial-updates multiverse
## N.B. software from this repository may not have been tested as
## extensively as that contained in the main release, although it includes
## newer versions of some applications which may provide useful features.
## Also, please note that software in backports WILL NOT receive any review
## or updates from the Ubuntu security team.
deb http://mirrors.aliyun.com/ubuntu/ xenial-backports main restricted universe multiverse
# deb-src http://cn.archive.ubuntu.com/ubuntu/ xenial-backports main restricted universe multiverse
## Uncomment the following two lines to add software from Canonical's
## 'partner' repository.
## This software is not part of Ubuntu, but is offered by Canonical and the
## respective vendors as a service to Ubuntu users.
# deb http://archive.canonical.com/ubuntu xenial partner
# deb-src http://archive.canonical.com/ubuntu xenial partner
deb http://mirrors.aliyun.com/ubuntu/ xenial-security main restricted
# deb-src http://security.ubuntu.com/ubuntu xenial-security main restricted
deb http://mirrors.aliyun.com/ubuntu/ xenial-security universe
# deb-src http://security.ubuntu.com/ubuntu xenial-security universe
deb http://mirrors.aliyun.com/ubuntu/ xenial-security multiverse
# deb-src http://security.ubuntu.com/ubuntu xenial-security multiverse

list文件在/etc/apt/sources.list

然后更新源和软件

1
2
sudo apt-get update
sudo apt-get dist-upgrade

1.更换显卡驱动

显卡更换

ubuntu上有nvidia的驱动

2.同步时间

使用双系统时间不同,故要使用

1
sudo timedatectl set-local-rtc 1

3.安装软件

3.1 删除亚马逊链接

1
sudo apt-get remove unity-webapps-common

3.2 安装vim

sudo apt-get install vim

3.3 安装git和vpnc

sudo apt-get install vpnc git

3.4 安装ExFat文件系统驱动

Ubuntu默认不支持exFat文件系统的挂载,需要手动安装exfat的支持

sudo apt-get install exfat-fuse

3.5 修复分区

sudo ntfsfix /dev/sda8

3.6安装atom

官网下载最新版本 atom

3.7 uget+aria2下载工具

安装uget和aria2

1
sudo apt-get install uget aria2

配置

a.打开uget。

b.打开界面的编辑—>设置—>插件,插件匹配顺序:aria2 。

c.打开界面的分类—>默认一般设置。调整最大连接数(建议在5)。设置一下下载文件夹。

在火狐中使用Flashgot扩展就可以。

3.8 安装shadowsocks-qt5

  • 添加源安装
1
2
3
sudo add-apt-repository ppa:hzwhuang/ss-qt5
sudo apt-get update
sudo apt-get install shadowsocks-qt5

3.9 安装wine/TIM

使用 wine staging ( 开发版本的 wine )安装详细教程 https://wine-staging.com/installation.html

1
2
3
4
5
6
7
8
sudo dpkg --add-architecture i386
#add the repository:
wget -nc https://dl.winehq.org/wine-builds/Release.key
sudo apt-key add Release.key
sudo apt-add-repository https://dl.winehq.org/wine-builds/ubuntu/
#install
sudo apt-get update
sudo apt-get install --install-recommends winehq-staging

去qq官网下载TIM 我使用的是TIM1.2。

安装wine后 ,命令执行winecfg然后会安装一些插件,选择安装它们。然后拷贝windows字体(不安装字体会使一些字无法查看)。

windows字体在c:\windows\fonts

把这个目录下字体全部复制到wine下的设置目录下:

~/.wine/drive_c/windows/Fonts/

重载所有wine的配置wineboot
再次打开wine winecfg配置如图

wine 设置

然后重启一下wine wineboot 。安装tim时,使用Wine Windows Program Loader 打开TIM。然后就是windows下安装程序——点点点。

备注:此方法有个bug 当TIM打开讨论组时会是TIM崩溃。

建立桌面快捷方式

1
2
3
4
5
6
7
8
9
10
11
12
[Desktop Entry]
Encoding=UTF-8
Version=1.2
Name[en_US]=TIM
Name[zh_CN]=腾讯TIM
Exec=env LC_ALL=zh_CN.utf8 wine /home/h/.wine/drive_c/Program\ Files\ \(x86\)/Tencent/TIM/Bin/TIM.exe
Icon=/home/h/we/electronic-wechat-linux-x64/photo/TIM.ico
Terminal=false
NoDisplay=false
StartupNotify=true
Type=Application
Categories=Network;InstantMessaging;

3.10 安装electronic-wechat

项目在 github 上 。
我使用源码安装失败了,npm总是出错,不知为什么。(如果你使用源码安装成功,请求教)最后使用安装版,见此 https://github.com/geeeeeeeeek/electronic-wechat/releases

在桌面上建立图标

1
2
3
4
5
6
7
8
9
10
[Desktop Entry]
Encoding=UTF-8
Name=微信
Comment=electronic-wechat
Exec=/home/h/we/electronic-wechat-linux-x64/electronic-wechat
Icon=/home/h/we/electronic-wechat-linux-x64/photo/icon.png
Terminal=false
StartupNotify=true
Type=Application
Categories=Application

3.11 安装最新的python3

首先下载最新的python版本,这个在python官网上下载python官网

解压 进入其目录

1
2
3
./configure
make
make install

安装完后检查二进制文件的位置

1
2
which python3
python3 -V #V是大写的

3.12安装最新版本的npm 和 nodejs

首先安装npm和 nodejs

1
2
sudo apt-get install nodejs-legacy
suao apt-get install npm

ubuntu上安装时npm和nodejs都是低版本。

  • 升级npm

    1
    sudo npm install npm -g
  • 升级node.js

    1
    2
    sudo npm install -g n
    sudo n stable

4.gnome3的安装和配置

]]>
ubuntu 安装 教程 ubuntu
<![CDATA[github+hexo 搭建博客]]> /2017/10/15/github-hexo-%E6%90%AD%E5%BB%BA%E5%8D%9A%E5%AE%A2/

前言

本文章讲述如何利用 github pageshexo 建博客

准备环境

  • 有一个github账号,没有的话去 github https://github.com/ 注册一个;
  • 安装node.js、npm
  • 安装git
  • 安装hexo

本文所使用的环境:

  • ubuntu 16.04
  • node.js 8.6.0
  • git 2.7.4
  • hexo 3.3.9

搭建github博客

创建仓库

在注册完github帐号后,新建一个名为用户名.github.io的仓库,比如说,如果你的github用户名是test,那么你就新建test.github.io的仓库(必须是你的用户名,其它名称无效),将来你的网站访问地址就是 http://test.github.io

由此可见,每一个github账户最多只能创建一个这样可以直接使用域名访问的仓库。

几个注意的地方:

  1. 注册的邮箱一定要验证,否则不会成功;
  2. 仓库名字必须是:username.github.io,其中username是你的用户名;

创建成功后,默认会在你这个仓库里生成一些示例页面,以后你的网站所有代码都是放在这个仓库里啦。

node.js&&npm 安装

ubuntu下安装

1
sudo apt-get install nodejs && npm

git 安装

其实ubuntu下直接安装就好:

1
sudo apt-get install git

配置SSH key

为什么要配置这个呢?因为你提交代码肯定要拥有你的github权限才可以,但是直接使用用户名和密码太不安全了,所以我们使用ssh key来解决本地和服务器的连接问题。

用git bash执行如下命令:

1
$ cd ~/. ssh #检查本机已存在的ssh密钥

如果提示:No such file or directory 说明你是第一次使用git。

1
ssh-keygen -t rsa -C "邮件地址"

然后连续3次回车,最终会生成一个文件在用户目录下,打开用户目录,找到.ssh\id_rsa.pub文件,记事本打开并复制里面的内容,打开你的github主页,进入个人设置 -> SSH and GPG keys -> New SSH key:

将刚复制的内容粘贴到key那里,title随便填,保存。

测试是否成功

$ ssh -T git@github.com # 注意邮箱地址不改

如果提示Are you sure you want to continue connecting (yes/no)?,输入yes,然后会看到:

Hi liuxianan! You’ve successfully authenticated, but GitHub does not provide shell access.

看到这个信息说明SSH已配置成功!

此时你还需要配置:

1
2
$ git config --global user.name "liuxianan"// 你的github用户名,非昵称
$ git config --global user.email "xxx@qq.com"// 填写你的github注册邮箱

配置完之后输入:

1
$ git config --list #查看已设配置

查看username,email是否正确

使用hexo写博客

hexo简介

Hexo是一个简单、快速、强大的基于 Github Pages 的博客发布工具,支持Markdown格式,有众多优秀插件和主题。

官网: http://hexo.io
github: https://github.com/hexojs/hexo

原理

由于github pages存放的都是静态文件,博客存放的不只是文章内容,还有文章列表、分类、标签、翻页等动态内容,假如每次写完一篇文章都要手动更新博文目录和相关链接信息,相信谁都会疯掉,所以hexo所做的就是将这些md文件都放在本地,每次写完文章后调用写好的命令来批量完成相关页面的生成,然后再将有改动的页面提交到github。

安装

1
$ npm install -g hexo

初始化

在电脑的某个地方新建一个名为hexo的文件夹(名字可以随便取)

1
2
3
$ cd ~/hexo/
$ hexo init #初始化文件夹
$ npm install #安装包

hexo安装成功后,hexo文件夹目录为:

1
2
3
4
5
6
7
8
.
├── _config.yml // 网站的配置信息,你可以在此配置大部分的参数。
├── package.json
├── scaffolds // 模板文件夹。当你新建文章时,Hexo会根据scaffold来建立文件。
├── source // 存放用户资源的地方
| ├── _drafts
| └── _posts
└── themes // 存放网站的主题。Hexo会根据主题来生成静态页面

具体内容可见hexo建站

然后输入下面:

1
2
$ hexo g # 生成public文件夹(浏览器访问资源)
$ hexo s # 启动服务

执行以上命令之后,hexo就会在public文件夹生成相关html文件,这些文件将来都是要提交到github去的

hexo s是开启本地预览服务,打开浏览器访问 http://localhost:4000 即可看到内容,很多人会碰到浏览器一直在转圈但是就是加载不出来的问题,一般情况下是因为端口占用的缘故,因为4000这个端口太常见了,解决端口冲突问题请参考这篇文章:

http://blog.liuxianan.com/windows-port-bind.html

第一次初始化的时候hexo已经帮我们写了一篇名为 Hello World 的文章,默认的主题比较丑,打开时就是这个样子:

配对ssr

打开~\Hexo 文件夹中的_config.yml文件,填写内容

1
2
3
4
5
6
# Deployment
## Docs: https://hexo.io/docs/deployment.html
deploy:
type: git
repository: git@github.com:WarlockFish/WarlockFish.github.io.git #填入你的github链接,我填的是我的
branch: master

修改主题

默认主题很丑,可以来替换一个好看点的主题。这是 官方主题 链接

我使用的是 next .
喜欢使用可以安装:

1
$ git clone https://github.com/iissnan/hexo-theme-next themes/next

记住要在hexo目录中执行上面指令。

修改hexo目录中的_config.yml中的theme: landscape改为theme: next,保存退出,
然后执行hexo g来重新生成文件。

1
2
3
4
# Extensions
## Plugins: https://hexo.io/plugins/
## Themes: https://hexo.io/themes/
theme: next

写博客

hexo

1
hexo n "name of the new post"

~/hexo/source/_posts下会生成一份博客,Hexo使用MarkDown写作语法。写完后可以使用

1
2
hexo g
hexo s

然后可以在本地访问 http://localhost:4000 查看效果,便于更改

更新Github

进入目录

1
2
3
$ cd ./hexo
$ hexo g #编译本地内容
$ hexo d #上传到github上

这样就发布成功了,可以在网络上访问了。

谢谢阅读!!

]]>
github + hexo new github pages hexo 教程 配置
<![CDATA[my-first-blog]]> /2017/10/07/my-first-blog/

前言

使用github pages服务搭建博客的好处有:

  1. 全是静态文件,访问速度快;

  2. 免费方便,不用花一分钱就可以搭建一个自由的个人博客,不需要服务器不需要后台;

  3. 可以随意绑定自己的域名,不仔细看的话根本看不出来你的网站是基于github的;

  4. 数据绝对安全,基于github的版本管理,想恢复到哪个历史版本都行;

  5. 博客内容可以轻松打包、转移、发布到其它平台;

  6. 等等;

]]>
github pages new github pages 静态网站
<![CDATA[Hello World]]> /2017/10/07/hello-world/ Welcome to Hexo! This is your very first post. Check documentation for more info. If you get any problems when using Hexo, you can find the answer in troubleshooting or you can ask me on GitHub.

Quick Start

Create a new post

1
$ hexo new "My New Post"

More info: Writing

Run server

1
$ hexo server

More info: Server

Generate static files

1
$ hexo generate

More info: Generating

Deploy to remote sites

1
$ hexo deploy

More info: Deployment

]]>
hello world